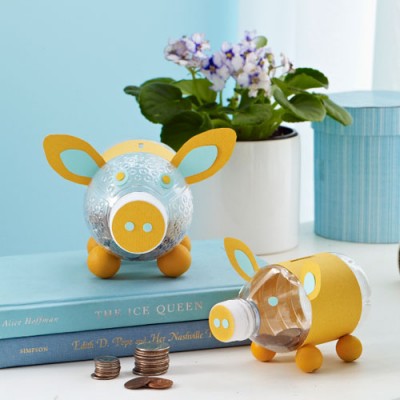
Water Bottle Piggy Bank
Materials you have:
- Empty plastic beverage bottle (the wider the better)
- Craft knife
- Scissors
- Colored paper (1 sheet orange, 1 sheet blue)
- Pencil
- Craft glue
- Transparent tape
- Hole punch
- Paintbrush
Materials you need:
- Ear templates
- 4 wood beads (3/4" diameter)
- Orange acrylic paint from Staples
Instructions:
- Peel label off clean, empty bottle. Use craft knife to cut a 1 1/2" x 1/8" wide slot (for inserting coins) in bottle, about midway between top and bottom.
- Use scissors to cut a strip of orange paper long enough to wrap around bottle and same width as bottle label. Wrap paper around bottle and use a pencil to trace over slot in bottle. Unwrap paper and cut slot with craft knife.
- Use scissors to cut out ear and inner-ear templates. Place ear template on orange paper and trace around. Repeat for other ear. Cut out. Place inner-ear template on blue paper and trace around. Repeat. Cut out. Fold ears at tab. Position ears along edge of paper band, about 1" to each side of slot. Tape tabs to back of paper band. Wrap band with ears around bottle, aligning slots on bottle and paper. Overlap ends of band and tape seam.
Make a Cute Sock Toy for Kids
Keep kids busy with this toy that they'll enjoy long after they're done crafting it.

Materials:
Sock (an anklet works great
Scissors
Polyester fiberfill stuffing
Straight pins
String or emrboidery thread
2 gloves (a pair or mismatched)
Felt-tip marker
Needle
Thread
3 buttons
1' thin ribbon (1/4" or thiner)
Directions:
1. If sock isn't an anglet, cut off leg just above heel; discard. Fill sock with stuffing and close opening with pins (this it top of head). To form neck, tie string around stuffed sock, about 1/3 down from heel end (heel is back of head).
2. Cut two fingers off each glove, cutting into stuffing. Mark where you want arms attached to body. Cut a slit for each arm, slightly smaller than width of stuffed glove finger. Repeat for legs. To attach limbs, insert tab of glove finger into hole and sew, working around edges of limb.
3. For ears, cut two more fingers off a glove. Trim each to 1" long. (Do not stuff.) Unpin top of ead. Fold material under so raw edges are inside. Insert an ear at each end of opening; pin in place. Pin together top of head. Sew closed.
4. Position buttons for eyes and nose. Sew buttons to head. Tie ribbon around neck, then trim.
Make a Tin-Can Wind Chime
Use old cans and paint to create this charming wind chime.

Materials:
5 or 6 tin cans in different sizes
Acrylic paint or latex wall paint
Paintbrushes
Painter's tape
Hammer
Nail
Twine
Scissors
10"-wide embroidery hoop
Hot-glue gun
Directions:
1. Rinse cans in hot water and remove any labels. Let dry. Paint cans a solid color, applying two coats (TIP: Semi- or high-gloss paint gives cans a great shine.) Paint gemoetric designs on cans. For stripes, use painter's tape to mask off sections. Let dry.
2. Using a hammer and a nail, tap a small hole through center of a can bottom. Cut a 3' length of twice and thread through hole. Knot end inside of can. Repeat for remaining cans.
3. Tie cans to embroidery hoop using simple square knots. Space evenly around hoop. Vary lengths so they can hang at different heights. Make sure they care close enough to one another to collide when wind blows, so they will make a sound. Apply glue to each knot to keep it in place.
4. Glue one end of twine to hoop, then wrap twine around hoop until completely covered. Glue end in place. To make a hanger, cut three 2'-long pieces of twine. Tie each piece to hoop, spaced evenly around hoop. Tie pieces together in a single knot, making sure hoop hangs level.
Make Rock Animal Crafts
Kids will love crafting rocks into cute tigers, pandas and leopards with some paint and construction paper.

Materials:
2 rocks, one smaller than the other (1 pair for each animal)
Acrylic paint in assorted colors
Paintbrushes
Hot-glue gun
Construction paper
Scissors
Directions:
1. Paint rocks a solid color; let dry. Using a small brush, paint details such as spots, stripes and (on smaller rock) facial features. Let dry. Glue smaller rock to larger rock.
2. For ears, cut a pair of circles or ovals out of construction paper, adding a tab or stem. For panda, cut a pair of circles out of white paper that are about 1/3 smaller than black circles, and glue them to black circles. Glue ears to head. Leopard's ears are painted directly onto rock.
DIY Bow-Tie Hair Barrettes
Turn bow-tie pasta into cute and colorful DIY hair barrettes.

Materials:
Acrylic paint
Paintbrushes
Uncooked bow-tie pasta
Hot-glue gun
Plain metal barrettes
Clear nail polish
Directions:
1. For each barrette, paint two bow-ties a solid color. Let dry, then add a design such as stripes or dots. Let dry.
2. Glue bow ties, side by side, to metal barrette clip.
3. Apply clear nail polish to top side of bow ties to help prevent paint from chipping.
Easy DIY Felt Pillows
Create a comfy, cozy vibe with these easy DIY pillows.

YOU'LL NEED:
- Cushion pad
- Felt
- Thread
- Sewing machine
- Compass
- Pencil
- Craft paper
- Fabric marking pen (erasable)
INSTRUCTIONS:
- Draw a 12”square on craft paper. Use a compass to draw 4” semi circles around the square edges (3/4 circles at the corners). Cut out.
- Pin the template to felt. Trace with a fabric pencil and cut out.
- Mark a line across the template 2/3 of the way down and cut, discarding the remaining third. Use this template to cut 2 pieces.
- Overlap the 2 shorter pieces to make a square and place on top of the larger piece. Pin the pieces together and sew a 12” square inside the scalloped edges.
- Dampen and erase any markings from the fabric pen.
Create a One-of a Kind Bureau
A pretty paint and stylish stencil design is all it takes to give your bureau a beautiful makeover.

Have you ever set your sights on a beautiful hand-painted dresser, only to be discouraged by the cost? You can create a similar look yourself―for a fraction of the price. Start with a sturdy dresser or bureau that's either unfinished or has a relatively smooth, even surface, and let your creativity do the rest!
YOU'LL NEED:
- Newspaper or drop cloth
- Soft rag
- Wood putty
- Screwdriver
- 120- and 220-grit sandpaper
- Sanding block
- Tack cloth
- Primer
- Paint (opt for satin or semi-gloss)
- 2" brush
- Stir stick
- Polyurethane (optional)
1. Get ready. Place the dresser on newspaper or a drop cloth in a well-ventilated area. Dust the piece thoroughly with a soft rag. Clean any stains or dirt with dishwashing liquid and water. Fill in nicks, holes or grooves with wood putty. Remove knobs and any other hardware. Pull out the drawers and set them on the drop cloth so you can paint them separately.
2. Sand to perfection. (Skip this step if your piece is unfinished.) Working with the grain, sand the entire dresser and the fronts of the drawers, using the sanding block and coarse 120-grit paper. You don't have to erase every bit of the finish, just enough to smooth out imperfections and roughen the surface so the paint adheres. Brush away the dust, and sand again with finer, 220-grit paper. Wipe dresser thoroughly with a tack cloth.
3. Apply primer. Mix primer well with a stir stick. Apply with a 2" brush in long, even strokes, painting one area at a time and working with the grain. (To prevent sticking, don't apply primer or paint to the sides of drawers.) Let the primer dry according to the manufacturer's instructions, then lightly sand with 220-grit paper. Wipe the piece clean using a tack cloth. If the piece has stains that need covering, apply a second coat; let dry, then lightly sand again.
4. Paint the surfaces. Using the primer technique described above, apply one coat of paint. Let the paint dry completely, then sand with the 220-grit paper, wipe down and add a second coat of paint (use more if needed to cover completely; sand between coats). If the piece will endure a lot of wear, apply two protective layers of clear polyurethane, sanding between coats. (If you're planning to add a stencil to the piece, do it first, then apply thepolyurethane.) When paint is completely dry, reinstall knobs and replace drawers in bureau.
